How to Fix ‘Application-specific permission settings’ Error?
When encountering the Application-specific permission settings error, it usually results in certain applications failing to launch or function correctly. This error indicates that the specific permission settings do not grant necessary permissions for the COM Server application, causing issues such as system crashes or application failures.
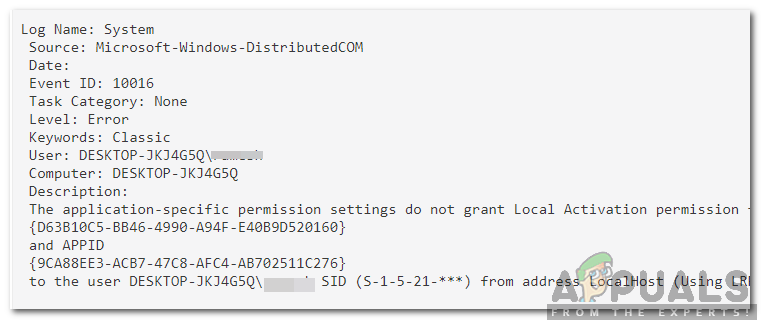
The most common cause is incorrect DCOM (Distributed Component Object Model) configuration settings, often found in Event Viewer under Event ID 10016. Other potential causes include registry key permissions and misconfigured user account permissions.
Resolving this error requires modifying security settings in the Component Services or editing registry entries to adjust permissions. It’s essential to handle these changes carefully to avoid further system issues.
What Causes this Error?
After receiving numerous reports from multiple users, we investigated the issue and devised a solution to fix it completely. We also identified the reason this error occurs, which is listed below:
- Invalid Permissions: The error occurs when a specific process lacks sufficient permissions to access the indicated DCOM components in the event log.
Note: It is possible for the system to function correctly in some cases despite this error. If that is the case, it may be best to disregard the error. However, if the error is preventing an application from functioning correctly, follow the guide below:
Granting Access to DCOM Components
As indicated in the error message, the issue occurs when certain processes or applications don’t have access to the DCOM components.
By adjusting the access settings to DCOM components, we basically recalibrate permissions, making sure that the necessary processes obtain the clearance they need to interact with system elements effectively.
This coordination is important because it fixes the underlying permission inconsistency that causes the error, thereby normalizing system operations and potentially resolving the activation permission conflict reflected in the event logs.
- Press the Windows + R keys to open the Run prompt.
- Type regedit and press Enter.
- Navigate to the following registry key:
HKEY_CLASSES_ROOT\CLSID\
HKEY_CLASSES_ROOT\AppID\
Right-click on the registry key in the left pane.
Select the Permissions option and then choose Advanced.
Click the Change option next to the Owner heading.
Note: The owner might be listed as Trusted Installer or it may display Cannot Display Owner.
Select the Object Type option and choose Users.
Click the Location button and choose your computer from the list.
In the provided text field, enter the username of your account.
Press OK and then click Apply to confirm the changes. Note: Repeat steps 5-12 for the registry key HKEY_CLASSES_ROOT\CLSID\ as well.
Close the window and return to the Permissions window from step 7.
Select Administrators under the Group or User names heading and check the Full Control option.
Choose Users and also grant Full Control.
Click Apply to save the changes and then select OK to close the window.
Open the Run prompt again by pressing Windows + R.
Type dcomcnfg.exe and press Enter.
Expand the following sequence in the left pane:
Component Services > Computers > My Computer > DCOM Config
Right-click on the Runtime Broker item and select Properties.
Note: There are two instances of Runtime Broker in the list. You will need to check both to identify the correct one.
Check if the AppID matches 9CA88EE3-ACB7-47C8-AFC4-AB702511C276. If so, you have found the correct instance.
Select the Security tab and tick the Customize radio button under Launch and Activation Permissions.
Click on the Edit button. If prompted by a Windows Security message, click Remove.
Press the Add button and type NT AUTHORITY\LOCAL SERVICE in the prompt.
Note: If NT AUTHORITY\LOCAL SERVICE is not present, try typing Local Service.
Click OK and grant the Local Activation permission to the new entry.
Verify if the issue has been resolved.
